
JuliaPro's Julia on Jupyter Notebooks
In this post I will show you how to set JuliaPro’s installation of Julia on a separate kernel in Jupyter on Windows.
I recently installed JuliaPro at the suggestion by one of my coworkers, but doing so changed the local installation of the Julia kernel on Jupyter. If you don’t currently use Julia and JuliaPro is your first and only install, then you may not need to read any further as the Julia kernel in your Jupyter will be the one from JuliaPro.
Julia Introduction
Before I begin, I should describe Julia. Julia is a numerical and scientific computing programming language. By extension, Julia is also a data analysis and data science programming language. This is what gets me excited about Julia, the fact that it originally designed to perform mathematics and statistics, and this is the reason why I love the R programming language. In addition, it solves the 2 language problem where you develop code once on your local and you can easily take your code and distribute it on a cluster. Finally, it is a high level langauge that performs at the speed of low level languages such as C.
JuliaPro is a solution created by the foks at Julia Computing to get you up and running with Julia fast and without dependencies to other languages such as Python. JuliaPro reminds me of Rstudio, and my favorite feature is the ability to build .jl scripts without the cell like structure of Jupyter Notebooks.
How to set Jupyter notebook for JuliaPro
I have been using Jupyter Notebooks as my main IDE for learning Julia. I also use it at work when I am working on our Hadoop platform to build analysis with SparkR where RStudio is not available. My experience at work is where I learned the solution below.
when I installed JuliaPro 1.2.0 I got the Jupyter kernel list shown below. So you could see my delimma, which Julia environment am I using? JuliaPro or base Julia? This is important because Julia really focuses on isolating environments for reproducibility.
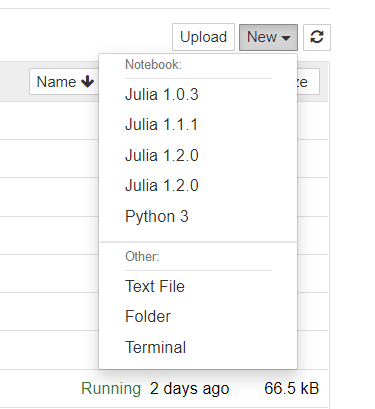
Jupyter Before
File location and Resources
In order to change to the name of the kernal, we will need to change the name in the kernel.json file. On Windows, this file can be found at the %APPDATA%/jupter/kernels folder according to the Jupyter Documentation. In my installation of Windows it is under %APPDATA%/Roaming/jupter/kernels. In this folder you will see folders for all the kernels that are installed in your version of Jupyter. If you are on a Mac or Linux, go to Jupyter Documentation for the path to the kernels folder.
In Julia/JuliaPro/Jupyter Notebooks
- Get App location: Launch Julia with JuliaPro, Julia Interpreter, or Jupyter notebooks. Type
ENVto get the environmetal variables associated with Julia. Look for the “APPDATA” file path; you will need this below. Note, this is how I discovered that my kernel was under the Roaming folder.
In GitBash (for Windows)
Change Directory to Jupyter’s kernel folder:
cd C:\\Users\\marqu\\AppData\Roaming\jupyter\kernels. This folder will list all the kernels available to your Jupyter installation.Check out kernel.json in folder julia-1.2: When you cat the kernel.json in the julia-1.2 folder, you will see that the path in the
argvis referencing the JuliaPro Julia executable. We need to change this to the reference your julia-1.2 Julia executable and we will need to create a new file for in the folder JuliaPro-1.2.
GitBash Commands:
cd julia-1.2
ls -la
cat kernel.json
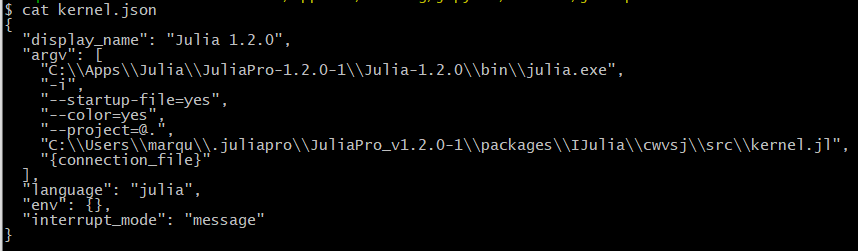
Jupyter Julia-1.2.0 Kernel.json Before
Copy basic Julia-1.2.0 kernel.json to a folder named Juliapro-1.2.0
- Make a copy of the Julia-1.2 folder, renamed JuliaPro-1.2: Change the new kernel.json file in the JuliaPro-1.2.0 Julia executable. Change the
display nameto JuliaPro 1.2.0 from Julia 1.2.0. Now Jupyter will display JuliaPro-1.2.0 for the JuliaPro-1.2.0 install instead of Julia-1.2.0.
GitBash Commands:
cp -avr /c/Users/marqu/AppData/Roaming/jupyter/kernels/julia-1.2 \ /c/Users/marqu/AppData/Roaming/jupyter/kernels/juliapro-1.2cd /kernels/juliapro-1.2
vi kernel.json
Hit “i” to insert, change
"display_name": "Julia 1.2.0"to"display_name": "JuliaPro 1.2.0"Hit ESC, then type
:wqand hit Enter.
Fix Julia-1.2.0 Jupyter Kernel
- Reset the Julia-1.2.0 kernel: Open the Julia-1.2.0 interactive app and rebuild the
IJuliapackage usingPkg.build("IJulia"). This will reset the Julia kernel.json in Jupyter. Big thanks to Avik Sengupta at Julia Computing for the tip; this saves me from using vi to change the kernel.json file for Julia-1.2.0. Now the Jupyter kernel list will display the proper names for each Julia executable (see below). You also know what packages are installed where as the packages installed on JuliaPro-1.2.0 are not in the same environment path as the ones installed in Julia-1.2.0.
Julia Interpreter Command Lind:
using PkgPkg.build("IJulia")
The code above builds this file for you, no vi needed. 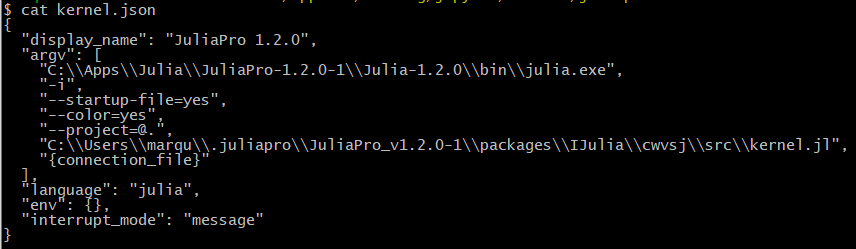
And clarifies which Julia kernel you can choose. 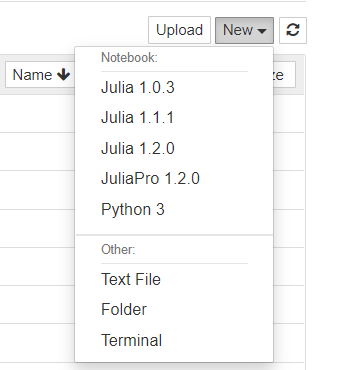
Conclusion
Some people may ask why go through all this work? Either chose one or the other IDE to build your Julia projects. At home this strategy makes sense, but at work you are bounded by the strategic choices made by your IT or platform team. I currently build all my analytical work in RStudio, but when I have work with big data on our Hadoop platform, then I have not joice but to use Jupyter notebooks to build my SparkR code. I hope that the folks at the Julia Computing come across this blog and consider making this change within JuliaPro.
References
Julia: https://julialang.org/
Julia Discourse: https://discourse.julialang.org/
Join Julia Slack: https://slackinvite.julialang.org/
GitBash vi: https://teamtreehouse.com/community/git-bash-text-editor
Jupyter: https://jupyter.org
Jupyter Common Directories: https://jupyter.readthedocs.io/en/latest/projects/jupyter-directories.html
Kudos for the Julia image goes to:
Julia - Julia and JuliaPro logos are trademarks of Julia Language and JuliaComputing. All other marks mentioned may be trademarks or registered trademarks of their respective owners.